There are several steps to add a Payment button to the register layout in Z Register. We've briefly covered the steps in our article Configuring Register Layout but these are more specific instructions.
If you need to create the Payment method, please refer to our article: Payment Methods that goes through how to create a Payment method.
Check What Register Layout the Store is Using
To add an agency button to your register layout, you will need to first ensure that you are editing or modifying the correct register layout.
To check what Register Layout you are using or to change which layout you are using:
How to Add a Payment Button
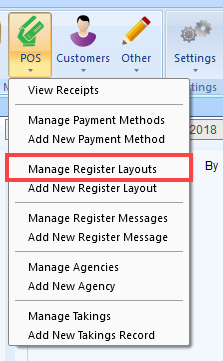
- Go to Z Office > POS > Manage Register Layouts

- Select the Register Layout you wish to update. You should be able to find the Register Layout that your store is using from above.
NoteYou can't update system default layouts which are indicated with a blue cog symbol
 . You can however, use them as a starting point by pressing the Save as New button.
 - From the Edit Register Layout window > Select the the Payment Menu tab to show layout settings for the Payment Menu:
a. Layout Name - The name of the layout
b. Sales Menu tab - The layout settings for the Sales Menu
c. Payment Functions - The list of available payment functions
d. Add Group - Add a new group/tab to the menu
e. Remove Group - Removes a group/tab
f. Remove Function - Removes a function button from the register layout
g. Group Settings - Modify the group settings - in particular the grid (amount of columns and rows)
h. Function Settings - Function settings - To add a new payment button you will need to ensure that your Register Payment Layout has space available to add the new button. To make more space, please refer to our article: Configuring Register Layout
- Once you have a spot for the new payment button, drag and drop the Pay Using button under Payment Functions on the left panel:
You can change the Title, Background, Text Colour, Image and also add a Keyboard Shortcut for the function in Function Settings on the right. - Once you are happy with the layout, click Save to save the changes
- Restart Z Register (i.e. close and reopen the program) on all your Till/Register Computers for the layout to update.


Comments
0 comments
Please sign in to leave a comment.